tips and tricks for growing gorgeous organic garlic

From ancient Egypt to modern Manhattan, garlic is one of those plants that you can find in almost every garden
It is one of the oldest cultivated crops, and all around the world people still rank garlic among their favorite foods. And it’s not just food — it’s medicine, too. Garlic is used as an antibiotic, antiviral, heavy metal detox, and to fight colds, high blood pressure, Alzheimers, diabetes and cancer. It even wards off vampires and evil spirits, or so they say.
Here are a few tips on how to grow garlic:
Start with quality seed garlic
Sure, you can plant that nice organic garlic you got at the Co-op or the farmers market. It was delicious, right? And it will probably grow just fine. But keep in mind that plants that were grown specifically for the purpose of being seed stock have been monitored for traits such as disease resistance, drought tolerance and uniformity, among many other things. And, by purchasing seed stock from a reputable grower, you are connecting to a lineage that is building long-term food security.
As for varieties, you will never run out of options, but here are some reliable ones to start with.
Softneck varieties, with a milder flavor, good for braiding and long-term storage:
Nootka Rose, for proven reliability in temperate climates, available from Garlicana in Southern Oregon. Check out their free PDF Catalog for an education on the history and genetics of garlic. www.garlicana.com
Transylvanian (because who could resist?) from Great Northern Garlic in central Washington State. www.greatnortherngarlic.com.
Chinese Pink, because it matures extra early. From Territorial Seed Company in the Willamette Valley, Oregon. www.territorialseed.com.

Stiffneck varieties, with a stronger flavor and edible scapes, great for roasting and pickling:
Turkish Giant, famous for giant, easy to peel cloves, also from Territorial (above).
Music, bred for large size, strong flavor and disease resistance. Available through High Mowing Seeds. Their online catalog features a cool comparison feature that lists several types of garlic. www.highmowingseeds.com.
Chesnok, a red Siberian variety known for hardiness and flavor, also from High Mowing.
Where to plant garlic
Garlic likes full sun, but it will still do OK in a spot that gets some shade. Garlic and roses are classic garden companions, and it stands to reason that garlic will also do well among other members of the rose family.
Try planting patches of garlic around your plums, peaches, apples, raspberries, blackberries and cherries. Or just clear a sunny area in your garden that you don’t mind devoting to garlic until next June (or so).
How to plant garlic
Use a small longneck bottle to make the holes in your freshly weeded and raked garden bed. A small hot-sauce bottle from a brand like Cholula works great for making the holes the perfect depth. Make each hole 6 inches apart, in a pattern that makes the best use of the space in your bed.
Now, break up the heads of your seed garlic and pull the outer papers off of each clove. Plant each clove individually, with the flat side down, pointy side up. Fill the holes with rich, organic compost.
Make sure to mulch!
Garlic is drought-resistant, to a point. A thick mulch can make a huge difference in whether your plants die of thirst or not. When you’ve just planted the cloves and filled the holes with compost, spread a thin layer of manure over the beds. Top that with 2 inches of straw mulch and saturate the whole area with water. Add another inch of straw and forget about it for the winter. If there is a very dry Autumn, water the patch a couple of times. But it will probably be just fine on its own as long as we get some rain by January.
Weed, fertilize, and mulch again.
Garlic is a “heavy feeder” and will do much better without a lot of competition. In the early spring, the stringy green tops of your garlic crop will be pushing out of the straw mulch, and so will a bunch of random weeds. Go through, pull out the weeds, and remove that overwintered straw mulch as you go. Now use a small rake to scratch in some organic fertilizer (anything that’s recommended for roses will work just fine).
Toss the old mulch on your compost pile and spread a fresh layer on your garlic patch. This helps prevent mold and mildew from gaining ground while your bulbs mature. Water well after this weeding-fertilizing-mulching adventure and then you don’t need to do much else until it’s time to harvest.

Eat the garlic scapes!
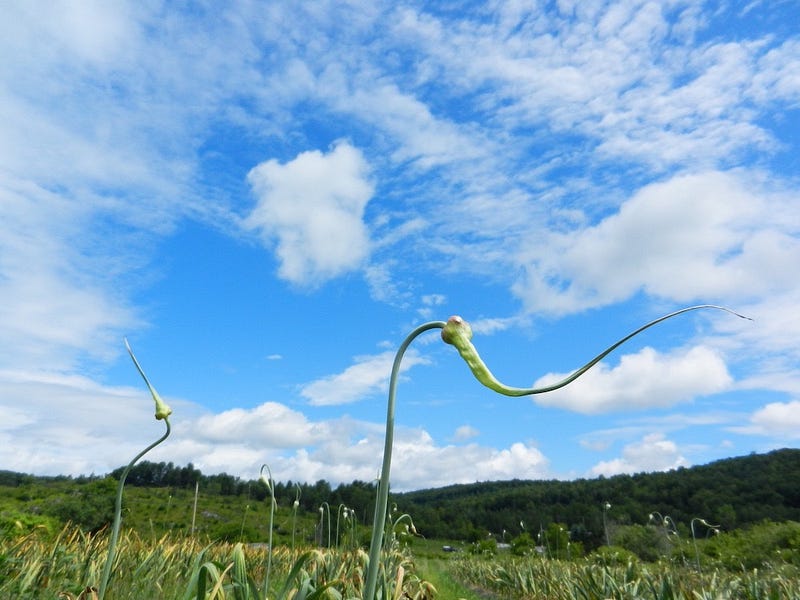
If you planted stiffneck varieties, you’re in for a treat. The flower stalks, called “garlic scapes,” are delicious when pan-fried or flame-grilled. The stalks will shoot straight up, crowned by a point head-bud, which will plump out and then curl around the stalk in a spiral pattern. Snap that off and fry it up! Removing the scapes also helps the heads grow bigger.
If you want to try and save the seedlets from the later-mature flower stalk, don’t cut the scape. Wait until the hard little seedlets are completely dry, and then harvest and replant them. Either way, once scapes have curled, it’s time to cut off any irrigation and let the garlic dry down a bit before harvesting.
Harvest
With softneck garlic, it is best to remove the straw mulch a couple of weeks before harvest, to help avoid mold. Plants that have mold on them will not store well, and they will infect the storage area with mold spores. If you spot moldy patches early, you can remove them with a clean knife. Keep the patch weeded and don’t overwater. When the heads seem to be starting to beef up (and the tops seem to be dying back a little) then rake all of the mulch off the area and cut the water.
It’s time to harvest when all of the tops are at least 60 percent brown. The night before, give the whole patch a good watering to soften up the ground for digging. Harvest gently, with a D-handled digging fork, working slowly and attentively to avoid slicing into the heads. Don’t yank on the tops and don’t cut them off. Garlic is delicate when first harvested! And don’t dig up the whole patch at once. Dig up a few heads and see if they are mature. Have the bulbs rounded out, or are they still elongated? There is no sense it waiting nine months for your crop and then harvesting it a week too early. Be patient!
Curing and storage
After harvesting, your bulbs need to cure for optimum flavor and storability. Leave the tops on and either braid them together or gather them into bunches for curing. Hang in a cool, dark, dry space for at least a month. This will cause the bulbs to harden and tighten. Now you can hang up the braids in the kitchen, and/or cut off the tops and store the heads, sell them, eat them, pickle them or give them to the neighborhood kids for Halloween!


