Sample design description and activity worksheet for GOBRADIMET
Design is a road-map for making things happen. Creative job opportunities are emerging for budding designers. The field is virtually unlimited because design permeates everything! At its core, design has to do with living intentionally. It’s about engaging with life. It’s embedded in us as humans, as the natural way in which we interact with the world around us. It’s how we make decisions every day. All of us can become active designers. There’s one caveat: the act of becoming a designer requires that a person apply a conscious design process. Unconscious decision making doesn’t equal design.
Now more than ever we need conscious designers and leaders who can facilitate and foster a transition towards a more regenerative culture. We have the potential to design integrative solutions even in the midst of planetary chaos, and reshape the direction of our evolution. The future of humanity hinges on our ability to design ways to inhabit the earth in an interconnected way.
The Designers Mind
Incorporating the cultivation of our ‘“Designer’s Mind” into our design practice allows us to harnesses the power of engaging clearly in an interconnected way as we use design models and processes. Without introspection and integration, and an awareness of the state(s) of mind, our designs will be continually restricted and fragmented by day-to-day distractions, attachments, unconscious conditioning, limiting beliefs and unresolved traumas (personal and collective). Considering that list, we’re doing fair to decent; Still, there are so many shitty designs (even in the Permaculture community) paved with good intentions.
Five Practices for Cultivating a “Designers Mind”:
1. Anchoring — Create a routine space for life to emerge by finding moments of stillness. A great place to connect with this silence is by sitting in nature.
2. Presence — Practice mindfulness in everyday moments to cultivate presence. Create a ritual awareness when engaging in day-to-day activities like walking upstairs, opening doors, cleaning, watering the garden, etc.
3. Observation — Refine your ability to proactively accept what is arising in each moment, rather than resisting. Allowing and witnessing what arises will create a powerful momentum. If you feed or resist judgment or negativity, it will persist.
4. Assessment — Use knowledge, language, time, roles and models as tools, but don’t be defined or limited by identifying with their meaning. Don’t get stuck in conceptualization.
5. Alignment — Recognize that many of your interpretations, judgments, beliefs, and motivations birth from thousands of years of complex social conditioning that resides within our ancestral DNA, impacting culture, your life experiences and family upbringing. Continually question your perceptions and motivations while at the same time dropping identification and expectations. Be sure your “Designers Mind” is in the driver seat, and not your ego, inner critic, judge or pain body.
I would highly recommend you read my articles on Emergent Design and Principles of Presence for additional tips on cultivating this mindset.
Choosing a Model
Models support design work resulting in more optimized solutions. Using intentional methods help us to achieve better experiences for the designers, the projects/products/services, the users, and the environments and systems which rely on the outcome of designs. There are variations of methodologies helpful to have in our designer’s toolkit. Some are more assessment/analysis based and others more intuitive/relative; however, when we use them together in appropriate circumstances, we have an integrative approach.
There are a variety of design methods. It’s important to understand them as tools rather than complete processes. In varying situations, different mechanisms may apply. Sometimes it’s necessary to expand outside of or discard parts of a process if it becomes limiting. Try not to get stuck in one-size fits all approach. Be creative.
I suggest experimenting with as many styles and tools as possible. Refine your technique. Merge what works for different models. Recycle steps that don’t feel appropriate. Apply a unique approach to each situation. Enjoy establishing a satchel of design tools that you can whip out to bedazzle your life.
If you’re unfamiliar with design tools or design thinking, I would suggest you read my articles An Introduction to Design for examples of various models.
This article is an activity worksheet to run you through a quick design process. I highly recommend that new designers practice using a complete design cycle from start to finish, applied to a small daily task, such a making a meal.
Let’s practice!
ACTIVITY WORKSHEET —
EMERGENT DESIGN with GOBRADIMET*
Emergent Design means being intentional and present with your process. Staying present and having a realistic appraisal of the current moment creates authentic connectivity. The groundedness in and acceptance of what is, exactly and intrinsically, is the foundation for any change. In that sense, the first position and ongoing practice of a designer is to be present, centered and connected before, during and after taking action. Routine reflection and observation keep us linked to the present moment and train us to realize emerging opportunities and constraints. These reflection points also help us keep tabs on who and what is driving the design.
GOBRADIMET an acronym for Goals — Observation — Boundaries — Resources — Analysis — Design — Implementation — Management — Evaluation — Tracking.
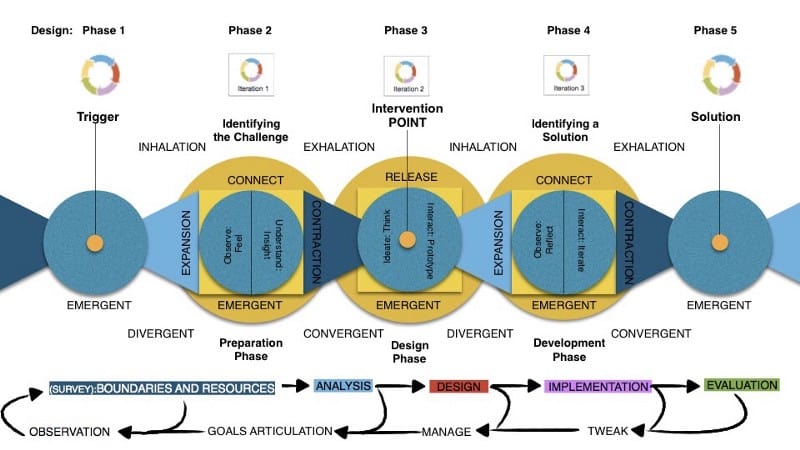
This graphical model highlights two fundamental patterns.
1. Expansion and contraction pattern that is the basis of all life (the inhalation/transition/exhalation of the breath). The breath keeps us in the now. Change happens in transitions. This is at the core of Emergent Design.
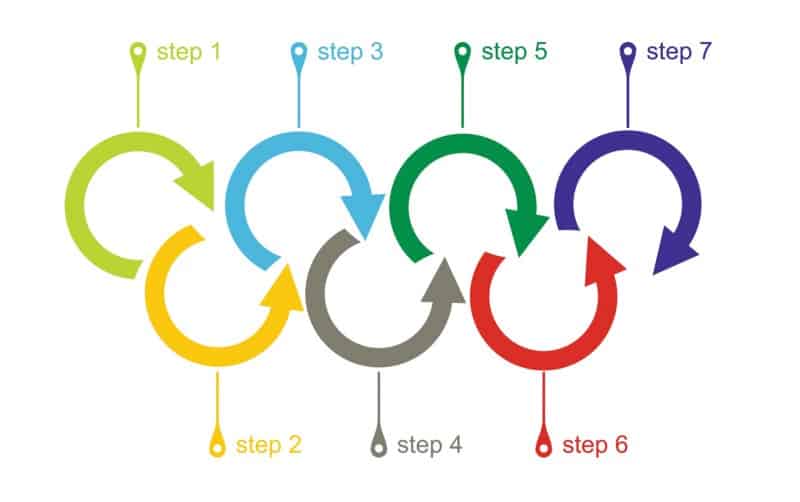
2. Spiral flow of energy that includes linear directional momentum with cyclical transitions (like seasons) that move through the entire design cycle at each phase, creating a spiral of learning. Each circle represents a moment of expansion and contraction. The spiral is the middle where life emerges. The momentum is moving in one direction →yet it spins like a wheel through each design step (GOBRADIMET) before moving onto the next iteration, or the next breath of the process. The wheel spinning becomes a spiral each time we learn and incorporate the new data that’s emerging. This spiraling means that both we as designers and the project are evolving.
At each point in the phase we step up in our awareness of the design — expanding our consciousness and the collective knowledge of the entire system, meaning that during phase one, the designer is going through each design process of GOBRADIMET to accomplish step 1. This pattern repeats indefinitely, continually expanding our awareness while at the same time refining the order and organization of the project and system we are working within.
Caution: Try not to get overwhelmed by the repetition of the steps. They happen rapidly. With a simple design such as a meal, you can go through an entire GOBRADIMET cycle in a few minutes. To simplify this for you, we are going to track the big cycle. I’m going to break that down. Two sequences are spinning. One is the big cycle from start to finish. From G to T of the model. When I say that the pattern repeats, I’m referring to that within G there is G to T, and within O there is G to T, etc.… but that all happens rapid fire in your brain. It’s important to note, AND we are not going to track the small cycles.
In actuality, this spiral is what the design process looks like, as each step contains a reflection of the entire process mirrored within itself.

Understanding the GOBRADIMET Steps and Phases
It’s helpful to identify the design components. There is a distinction made between the person who engages (designer) using ideas and beliefs (design thinking), within the context of design as a science (the study of design), with a design process (design methodology/model), specifically with the design object (project), and its related design challenge (intervention) and design solution (vision).
Phase 0: Introduction to Design: Setting the stage, and aligning your attitude and intentions.
This opening is for you to establish your intentions as the designer and for defining the design.
~ Designer: This is YOU!
~ Design Thinking: Emergent Design
We will use Emergent Design thinking for this activity. Emergent Design, in a nutshell, means that we will do our best to use a structured process as a container combined with agility and dynamic adaptability. We will aim to balance the form of our intentions with the flow of what is emerging.
~ Design Field: That’s US experimenting together!
~ Design Methodology: GOBRADIMET
~ Project: Making a Meal
~ Intervention: This depends on your goals and any limiting factors.
I consider it the design challenge that gets triggered. Ask what brought you here? What problems do you want to solve?
~ Vision: This is the solution to your intervention.
What will your design accomplish? What solutions will it create?
The Designers Mind
Before you step into Phase 1 of GOBRADIMET, it’s vital that your first iteration of design begins with a goal to cultivate the mindset of an Emergent Designer, and step into the present space of stillness, so that you may observe what arises. By silencing your mind, your appropriate design process elements will knowingly emerge. The inspiration for your design will appear. Here are tips for cultivating that space:
Once you have taken a period of intentional presence (a few minutes, hours or days — it’s up to you), then move into Design Phase 1. As you proceed through the design phases, continue to anchor back into presence awareness. Design without losing yourself or getting stuck in the process because of limitations.
Phase 1: Goals and Observation
~ Goals — forming intentions and creating a vessel for the experience. Set goals for yourself as a designer, the design process, and for the project.
~ Observations — being present in the moment and becoming aware of what emerges. Begin to notice the patterns that arise and how they make you feel. Something will trigger your attention. Whether it’s a challenge or inspiration, some awareness of a new thought wanting to be born will arise. By identifying the trigger, these raw observations expand into more refined holistic goal statements.
Phase 2: Boundaries and Resources (sometimes referred to as Survey*)
At this point, you’re aiming at identifying the possibilities related to the design challenge/inspiration by connecting into the system and interacting with its parts to further see what emerges. Surveying is a preparatory stage to design.
~ Boundaries — start surveying, locating and establishing boundaries. Look for edges, transitions, energy flows, and sectors of elements interacting with the system. What are the limitations and edges around energy, including personal limits of the designer or design clients?
~ Resources — start surveying the human and biological resources. Who are the stakeholders? What energy is contributing to or draining the system? What resources are available and where are the gaps? Keep the resource list expansive, meaning that you are gathering ideas rather than comparing or making decisions. Keep your mind open and curious.
Allow for understanding and insight to emerge during this survey phase, yet do not attach to your interpretations. Note them as data points.
Phase 3: Analysis and Design
~ Analysis/Assessment — Begin contracting the data you collected during your survey phase by sifting it through various analysis tools like SWOC (strengths, weaknesses, opportunities, constraints), zone/sector analysis, back-casting, scenario planning, input/output analysis, and cost/benefit analysis.
Be sure to include an assessment of your motivations and perceptions before proceeding to the design step. Don’t be self-limiting. This thinking process consists of an appraisal of comparing and contrasting data which leads to a synthesis of thought and a prioritization of next steps. You’ll want to refine the goal statements.
~ Design — Choose a scenario and create a project specification. Include who will be doing what, where, when and how. Identify the scope of the project, timelines, budgets, action steps, accountabilities, decision making, tracking and evaluation processes. It’s best to keep the initial design lean and straightforward rather than complex. Avoid trying to predict and control outcomes by providing excessive details (analysis paralysis).
Through the process of ideation and prototyping scenarios, you’ll decide how to intervene in the system, thus generating the design proposal. From here on out you will begin doing/taking action through short iterations and rapid prototypes.
Phase 4: Implementation and Management
~ Implementation — doing becomes the focus at this stage. You will likely go through multiple iterations of implementation as you prototype the design and continue to tweak the process based on the feedback loops and ongoing interactions/reflections.
~ Management/Maintenance/Monitoring — here’s where you go back to observation mode and the survey processes to gather once again an awareness of what’s happening during each iteration. Begin with expansion (collecting data and observations) and then move to contraction (filtering the data to make intentional changes/renegotiate the design). Through this process, you’ll get a sense of what needs managing, maintained, further monitored or documented.
After multiple iterations or implementation/management finally, a solution will arise that meets the design challenge, however, note that the problem may have evolved by this point. Once a solution is identified, then a more robust implementation of the project might be performed.
Phase 5: Evaluation/Enjoy and Tracking/Tweaking
~ Evaluation — Hopefully you already designed in feedback loops. Gather the data you’ve been collecting on your reflections, design process and the project itself. Track and account for any renegotiations. Remember that multiple sectors and goals began in phase one. It’s time to integrate and weave together a story and celebrate our successes and learnings.
Now at this transition moment, or possibly the end of your engagement with the project, it’s time to do a more thorough reflection on the process, outcomes, goals assessment, and identify the impact(s) the intervention had on the system. It’s important to anchor back into the mind of the conscious observer so once again you can harness what emerges. You will likely have noticed that many new design triggers (challenges and inspirations) arouse along this journey. Each step was a design process woven into the more extensive design web that serves as the fabric of life and compels us towards becoming an integral coevolutionary change agent. Also, enjoy. Don’t forget to relax and enjoy what you’ve created! Hard work is important, but so is relaxation, down-time, self-care, and obtaining a yield.
~ Tracking and Tweaking — Tracking is a reminder to document! Be sure to use both qualitative and quantitative tracking tools. Track and account for any renegotiations. This final step often includes presentation, reports or documentation measures for clients, or in considering future phases of a project. Similar to management, we may want to make final tweaks to the new system established to refine its effectivity. Tweaking also allows for further design inspirations and challenges to emerge because we are observing and interacting while being aware of what arises within us and within the system. In essence, this indicates that the design cycle process is ongoing.
Design Activity: Preparing a Meal
Please move through the following process to experience using the above GOBRADIMET design model. Keep your documentation light and easy, or quick and dirty. Consider this a ‘hopefully’ stress-free opportunity to combine intentionality with fluidity.
Step 1: Goals
Identify personal and project goals. How do you wish to engage? Perhaps you want to learn about design principles? Do you want to practice using this model? Do you want to have fun, maybe? What are the goals of the project? Perhaps you want to make a tasty meal and use vegetables from the garden?
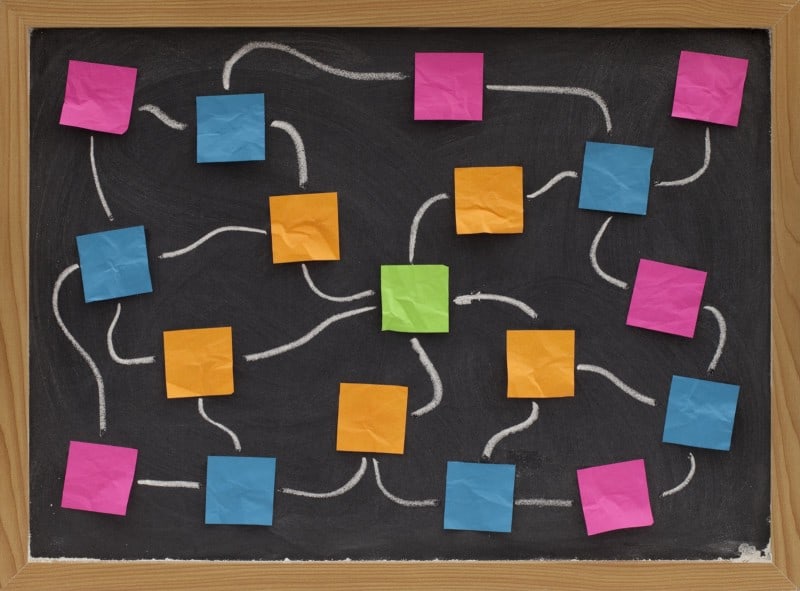
Documentation Station: Make a quick mind map of your goals. I suggest you summarize goals in 2–4 words and if desired add a brief description statement.
Step 2: Observations
Check in with your internal and external landscape. Close your eyes and go to a tranquil place. What do you notice emerging? Are you hungry? Is your tummy feeling healthy or maybe there’s some indigestion? Any cravings coming up? Don’t attach to any of the thoughts or sensations. Just note them.
Documentation Station: Doodle any reflections on what you observed.

Step 3: Boundaries
Identify the container. How much time do you have to cook? What’s the weather? Can you go outside to the garden or store? Are you limited to what’s in the house? Do you know if anyone who will eat the food has any dietary restrictions? What other boundaries might be involved? If applicable, survey the needs and desires of your housemates. Check back in with observation awareness.
Documentation Station: Record notes or a sketch on what arises.
Step 4: Resources
Identify the ingredients and supplies available. Now it’s time to look out in the garden, investigate in the frig and peek into the cupboards. What food stock do you have to create a meal? What kitchen supplies do you have for preparation? Check back in with observation awareness. When you see the different foods available, how does that make you feel?
Documentation Station: Jot down a few notes on what you observed.
Step 5: Analysis
Go back to the notes, doodling and mind map you created. Now start contracting your thoughts. Filter the information by using analysis. Fit your resources into your boundaries. Think of options and scenarios of what you can make, given the circumstances. Visualize running through a few scenes in your mind to discern how realistic it is to succeed in meeting your goals. Refine the goals if they’ve shifted.
Documentation Station: Identify three simple meal scenarios and run them through a quick inputs and outputs analysis and pay attention to possible opportunities or constraints. Keep your review rapid and your documentation dirty (rough/ straightforward).
Step 6: Design
Choose one of the three scenarios and come up with a list of ingredients, a recipe (if you want) and step-by-step action plan. Keep it simple. Being fluid is ok. Don’t over design. Here’s an example of designing to go with the flow instead of using a method: As a professional cook, I personally never use recipes. I sometimes don’t know what I’m going to make until I’m halfway through preparing the food. For instance, if my goal is to use all the leftover vegetables to clean out the frig, I get everything out and put it on the counter. During my analysis phase, I decide what vegetables and herbs can be combined (based on experience), and I note their cooking methods and time for preparation. My design is not about the end product but instead preparing the food in order of how long it takes to cook.
Documentation Station: Sketch up a quick flow chart of your proposed process.
Step 7: Implementation through Tweaking
Get busy making a meal! Now it’s time to roll up your sleeves and grab an apron! Get your stock and supplies out and start following your design. Oh, wait lol, actually put the plan away. Tuck it in that drawer we all have in the kitchen that collects things until they find a home or purpose, or put it on your altar, or stick it up on the frig with a magnet if you want to peek back. It’s up to you how much you want to interact with that outline, and/or your kitchen helper if you have someone helping. That design was an exercise to set a thoughtful container for your process. The vessel is like a ship. It’s a structure to capture your hopes and dreams for a yummy meal. Once you’re at sea, it’s time to go with the flow.
From this point on you’re going to be in an ongoing process of doing/observing, doing/evaluating, doing/managing and doing//tweaking cycle. It’s almost like each ingredient becomes it’s own mini design process from goals all the way through to evaluation. For example, a carrot: goal — cook it but keep it crispy and colorful! The design cycle just keeps spinning! Every thought and action is a micro design as life keeps emerging, and you keep observing and interacting. See if you can keep yourself aware of the present moment. Keep checking back in with your breath. Keep checking back in with finding your senses/thoughts/feelings internally and externally.
You can not predict exactly how something is going to cook or combine. For instance, the age of the broccoli is going to affect how long it needs to steam before it turns bright green. Similarly the quality of or brand of spice is going to determine how much you’re going to need to add before it tastes just right. There are so many factors that you need to stay aware of ever-changing conditions. For instance, the stove on your burner may have a flame that isn’t as it was yesterday, or your blender might stop working, or a grater may have gone missing, not to mention the empty bottle of tamari in the refrigerator that your roommate didn’t feel like cleaning. It’s an ever emergent process where you must stay alert and alive to participate.
A recipe is excellent, though I prefer this more fluid experience, especially in the kitchen where I get to use my sense as guideposts for improvisation regularly. At each moment I’m organizing my actions on integrating and weaving together dozens of steps into an orchestra of culinary art. Pay attention to the color, texture, smell, and taste of ingredients and the sound of food dry roasting or boiling. It’s quite an intimate and sensual extravaganza if you’re present.
Documentation Station: Write a short journal entry about your experience implementing your meal preparation. Share your beautiful and creative flow. I encourage you to get artsy here and even write a little poem or create a piece of art using leftover spices. The point is — get creative in sharing the facts and feelings about what occurred. Add the highlights and challenges that emerged, and how you managed and tweaked your flow. What did you notice about your ability to stay present and your skill at renegotiating and refining decisions/actions as things emerged? What tools did you use to manage/tweak the process? Maybe share a picture of your meal!
Then for evaluation jot down whether or not you met your goals. Part of this is undoubtedly giving us some tasty nuggets. Explain the experience of eating the meal you prepared. Was it delicious? Did it make your tummy feel full and satisfied? Did you make too much or too little? Did you make a mess? If any stress came up, can you identify the cause? Dive into that feeling a bit and see if there are any expectations or limiting conditions you unconsciously set for yourself. Is this a pattern in your life? Ok and finally, what did you learn about yourself and about preparing this meal? What would you do differently next time?
I hope that you enjoyed this experience and connected more deeply to Emergent Design thinking by applying it to an everyday task. I also hope that you enjoyed experimenting with GOBRADIMET! Have fun using this and other design models.

